How To Use A Hand Bulb Planter: Easy Planting Guide
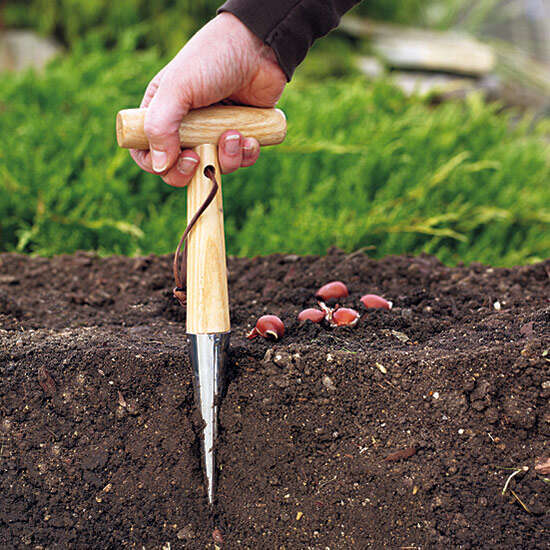
Push the planter into prepared soil, set the bulb at the correct depth, and cover it with loose soil.
Learning how to use a hand bulb planter makes fall planting faster, cleaner, and more accurate. After years of planting tulips, daffodils, crocuses, and small alliums, I have found that the right depth and bulb position matter more than speed. This guide explains how to use a hand bulb planter, avoid common mistakes, and give every bulb a strong start.

What Is a Hand Bulb Planter?
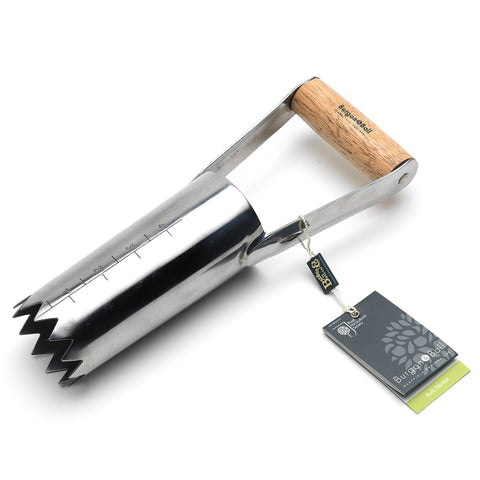
A hand bulb planter is a small garden tool made for planting individual bulbs. Most models have a narrow metal cup or tube that removes a plug of soil. Some have a pointed tip, a depth mark, or a spring-loaded handle that releases the soil after you place the bulb.
A hand bulb planter works best in loose garden soil, raised beds, containers, and small planting areas. It is less useful in hard clay, rocky ground, or soil filled with thick roots.
Common types include:
- Traditional cup planters that remove a round plug of soil
- T-handled planters that offer more grip
- Long-handled planters that reduce bending
- Dibber-style planters that create a narrow hole without removing a soil plug
- Adjustable planters with depth markings for different bulb sizes
The tool does not replace good soil preparation. Think of it as a cookie cutter for the ground. It creates a neat hole, but the soil still needs to be soft enough for the tool to enter.
When to Use a Hand Bulb Planter
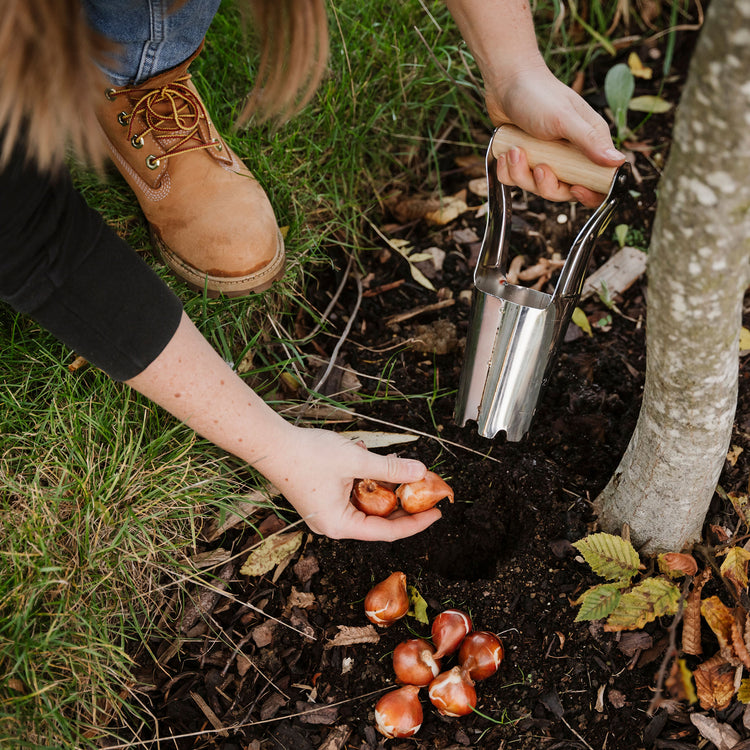
The best time to use a hand bulb planter depends on the type of bulb and your climate. Spring flowering bulbs, such as tulips and daffodils, are usually planted in fall. Summer bulbs, such as dahlias and gladiolus, are often planted in spring after the risk of hard frost has passed.
Use a hand bulb planter when:
- The soil is workable and not frozen
- The planting bed is free of large stones
- You are planting individual bulbs or small groups
- You want even spacing and depth
- You are replacing bulbs in an established garden
Avoid planting in waterlogged soil. Wet soil can smear around the tool and leave a compacted hole. It can also encourage bulb rot.
For most spring bulbs, the soil should be cool but not frozen. In many parts of the United States, this means planting from September through November. Local frost dates and the bulb package instructions should guide your final timing.

Tools and Supplies You Need
You do not need a large collection of equipment to use a hand bulb planter well. A few simple tools can make the work safer and more accurate.
Gather these supplies:
- A clean hand bulb planter
- Healthy, firm bulbs
- Compost or aged organic matter
- Gardening gloves
- A ruler or measuring tape
- A small hand rake
- Water
- A plant marker
- Bulb fertilizer, if a soil test or product label recommends it
Choose bulbs that feel firm and heavy for their size. Avoid bulbs that are soft, leaking, moldy, or badly damaged. A small amount of dry outer skin is normal, but deep rot is not.
Before planting, check the tool. The cup should be firm, the handle should not wobble, and the release mechanism should move smoothly. A damaged planter can make uneven holes or cause hand strain.
How to Use a Hand Bulb Planter Step by Step
The basic method is simple, but small details affect flowering. Follow these steps for reliable results.
1. Prepare the planting area
Remove weeds, dead leaves, and large stones from the bed. Break up hard clumps with a garden fork or hand cultivator.
Mix in compost if the soil is poor or compacted. Do not create a very rich pocket of fertilizer directly beneath the bulb. Excess fertilizer near the roots can damage new growth.
Level the surface with a rake. A smooth surface makes it easier to judge depth and spacing.
2. Check the bulb’s planting depth
As a general rule, plant most bulbs at a depth about two to three times their height. For example, a bulb that is 2 inches tall may need a hole about 4 to 6 inches deep.
This rule is only a guide. Large bulbs, sandy soil, heavy soil, and local weather can change the ideal depth. Always check the package instructions when available.
Shallow planting may expose bulbs to temperature swings and animals. Planting too deeply can delay growth or weaken the flower stem.
3. Mark the planting spots
Place bulbs in groups rather than in a strict straight line when you want a natural look. Odd-numbered groups often look more relaxed in borders and beds.
Use a ruler or the planter’s depth mark to estimate spacing. Small bulbs can usually be planted closer together than large bulbs, but they should not touch.
Avoid planting directly over tree roots. Roots can block the planter and compete with bulbs for moisture.
4. Hold the planter straight
Set the tip of the hand bulb planter on the soil. Hold the tool as upright as possible.
A straight position creates a vertical hole. If you angle the tool, the bulb may sit unevenly or grow at an awkward angle.
For a cup-style planter, press down with steady force. Do not twist aggressively if the tool meets a stone. Move the tool a few inches and try again.
5. Press the planter into the soil
Push the planter down until the depth mark reaches the soil surface. Some tools require a firm hand press, while others work best with gentle pressure from your palm.
In softer soil, the planter may enter easily. In heavier soil, make a small starter hole first with a trowel or dibber.
Never force a small hand tool with your full body weight. This can bend the shaft or strain your wrist.
6. Remove the soil plug
Pull the planter straight up. A cup-style tool should lift a small plug of soil from the hole.
Set the plug beside the hole. If your planter has a spring release, press the release to empty the soil later. Keep the plug intact when possible because it can help close the hole.
If the soil crumbles, that is not a serious problem. You can still place the bulb and return the loose soil by hand.
7. Place the bulb correctly
Put the bulb in the hole with the pointed end facing upward and the flatter root end facing downward.
For bulbs with no clear point, place the widest or root-covered end down. If the bulb is planted sideways, it can often correct itself, but proper placement gives it the best start.
Do not press the bulb hard into the soil. The base should rest naturally at the bottom of the hole.
8. Backfill the hole
Return the soil plug or fill the hole with loose soil. Do not pack the soil tightly with your hand or foot.
Lightly firm the surface so there are no large air pockets. The goal is contact between the soil and the bulb, not hard compression.
If the soil is dry, water the planting area after planting. This settles the soil and encourages early root growth.
9. Label and protect the area
Mark the planting spot if the bulb will remain underground for several months. A simple plant label can prevent accidental digging.
In areas with squirrels, chipmunks, or other bulb-eating animals, cover the bed with wire mesh or use a suitable protective method. Remove or secure the protection when shoots begin to emerge.

How Deep Should You Plant Bulbs?
Planting depth is one of the most important parts of learning how to use a hand bulb planter. Depth affects root development, temperature protection, stem strength, and flowering.
Use these broad guidelines:
- Small bulbs, such as crocus, often need about 2 to 3 inches of soil above them
- Medium bulbs, such as daffodils, often need about 4 to 6 inches of soil above them
- Large tulips may need about 6 to 8 inches of soil above them
- Large ornamental alliums may need about 6 to 8 inches of soil above them
Measure soil depth from the top of the bulb to the soil surface. This is different from measuring the full hole.
Heavy clay soil may call for slightly shallower planting than loose sandy soil. In containers, bulbs are also often planted a little closer together, but they still need enough soil above them for insulation and root growth.
When unsure, follow the bulb supplier’s instructions. Cultivar size and climate can make a meaningful difference.

Common Mistakes to Avoid
Many bulb planting problems come from small errors rather than poor bulbs. These mistakes are easy to prevent.
- Planting with the pointed end down: Roots and shoots may struggle to grow in the right direction.
- Using the planter in dry, hard soil: The tool may bend, and the hole may become uneven.
- Planting every bulb at the same depth: Bulbs vary in size and need different depths.
- Packing soil too firmly: Compacted soil can slow root growth and reduce drainage.
- Leaving bulbs exposed: Sunlight and dry air can damage bulbs before planting.
- Adding strong fertilizer directly below the bulb: Concentrated fertilizer may injure new roots.
- Overwatering after planting: Wet soil can cause rot, especially in poorly drained beds.
- Planting too close together: Crowded bulbs compete for water and nutrients.
- Ignoring animal damage: Freshly planted bulbs can attract squirrels and other pests.
One mistake I made early on was pushing a planter into soil that looked damp but was actually sticky clay. The tool pulled up a dense plug and left a smooth-sided hole. Water collected around the bulb later. Now I test the soil first by squeezing a handful. If it forms a sticky ball instead of crumbling gently, I wait for a drier day.

Tips for Better Results With a Hand Bulb Planter
A few practical habits can make planting more comfortable and consistent.
Work in small sections
Plant one small area at a time. This helps you maintain even spacing and prevents bulbs from drying out while you work.
Use a depth mark
If your planter has no depth guide, add a small strip of weather-resistant tape around the shaft. Measure the correct distance first, then place the tape at that point.
Rotate planting locations
If bulbs perform poorly in one spot, avoid planting the same type there every year. Soil diseases and pests can build up over time.
Improve drainage
Mix organic matter into heavy soil, but do not create a deep layer of compost that holds water beneath the bulbs. Raised beds and gentle slopes can also improve drainage.