When To Repot Juniper Bonsai: Best Timing And Care Tips
Repot a juniper bonsai in early spring, just before new growth begins, every two to four years.
Knowing when to repot juniper bonsai helps protect its fine roots, improve drainage, and keep the tree growing with strength. The best timing depends on the tree’s age, root growth, soil condition, climate, and health. This guide explains the signs to watch, the safest season, and the steps that help a juniper recover well after repotting.
The Best Time to Repot Juniper Bonsai
The best time to repot juniper bonsai is usually early spring. Repot the tree just before its buds begin to open and new growth starts. At this time, the tree is leaving dormancy and can repair damaged roots more easily.
In most parts of the United States, this means late February through April. The exact month varies by climate. A juniper in Oregon may be ready before one in Minnesota, while a tree in Florida may begin growing much earlier.
Early spring works well for three main reasons:
• The tree is becoming active, but its energy needs are still low.
• Cool weather reduces stress and slows moisture loss.
• New roots can develop soon after the tree enters its growth period.
Avoid repotting during extreme heat, freezing weather, or periods of strong new growth. Summer repotting can dry the roots quickly, while winter repotting can leave damaged roots unable to heal.
How Often Should You Repot a Juniper Bonsai?
Most young juniper bonsai trees need repotting every two to three years. Older trees often need repotting every three to five years. A tree in a small pot with fast root growth may need attention sooner.
There is no perfect calendar rule. The root system tells you more than the date does. A healthy juniper with open, well-draining soil may remain in the same pot longer than a younger tree with dense roots.
Consider repotting when:
• Roots circle tightly around the inside of the pot.
• Water runs over the soil instead of soaking in.
• Water drains very slowly.
• The soil stays wet for many days.
• The tree becomes loose in the pot.
• New growth is weak despite good light and feeding.
• The soil has broken down into fine dust or mud.
• Roots fill most of the pot.
A mature juniper bonsai can sometimes live in the same pot for several years. Frequent repotting is not always helpful. Each repot causes stress, so the goal is to repot only when the roots or soil need it.

Signs Your Juniper Bonsai Needs Repotting
The clearest sign is a crowded root ball. When you slide the tree from its pot, look at the outer roots. A few circling roots are normal, but a thick mass of roots around the pot wall means the tree has limited room for water, air, and new root growth.
Poor drainage is another strong warning. Bonsai soil should drain quickly while holding enough moisture for the roots. If water sits on the surface or takes a long time to leave the drainage holes, the soil may be compacted or broken down.
A juniper may also need repotting when its soil has lost its structure. Good bonsai soil contains particles that create small air spaces. Over time, those spaces collapse. The roots then receive less oxygen, which can lead to weak growth or root disease.
Watch for these less obvious signs:
• The tree dries out within a few hours on hot days.
• The tree remains wet for a week after watering.
• The foliage loses color without another clear cause.
• The soil pulls away from the pot edge.
• The tree has not produced strong growth for several seasons.
These signs do not always prove that repotting is needed. Poor light, pests, overwatering, root rot, and weak fertilizer can cause similar symptoms. Check the roots and soil before making a decision.

When Not to Repot Juniper Bonsai
Do not repot a juniper bonsai simply because spring has arrived. The tree should be healthy and close to its natural growth cycle. Repotting a weak tree can turn a small problem into a serious one.
Delay repotting if the tree shows signs of stress, such as:
• Yellow or brown foliage with no clear cause.
• Severe pest damage.
• Fungal disease or soft, dark roots.
• Recent heavy pruning.
• Recent wiring that caused bark damage.
• Drought stress or serious overwatering.
• Sudden needle loss after a major weather change.
A tree that is already struggling has less energy for root recovery. Treat the main problem first when possible. For example, improve light and watering habits before repotting a tree that is simply being kept too wet.
There are times when emergency repotting is necessary. If the soil smells sour, roots are black and soft, or water cannot drain at all, waiting for spring may risk the tree’s survival. In that case, remove damaged soil and roots with care, then place the tree in a clean, open mix.

Repotting Juniper Bonsai in Different Climates
Climate changes the answer to when to repot juniper bonsai. The tree responds to local temperature and daylight, not to a fixed date on the calendar.
In cooler northern states, early spring may arrive in April or May. Wait until the worst freezes have passed, but do not wait until the tree has pushed a large flush of new growth.
In mild coastal areas, repotting may be suitable from late winter into early spring. Protect the tree from cold rain and strong wind after the work.
In hot southern states, late winter may be the safest period. A juniper may begin growing early, so watch the buds rather than relying on the calendar.
For indoor or greenhouse grown bonsai, timing can be less predictable. Trees kept warm may grow at unusual times. Move the tree toward a natural seasonal cycle when possible, and avoid repotting during a sudden burst of growth.

How to Check the Roots Before Repotting
Before you repot, water the juniper one day in advance. Moist soil holds together better, and hydrated roots handle the work more safely. Do not repot a tree with soaking wet, muddy soil if you can wait for it to drain.
Remove the tree carefully. Many bonsai pots have wires that hold the tree in place. Cut these wires before pulling. Use a blunt tool to loosen the edge of the soil, then lift the trunk base or root ball with steady pressure.
Inspect the roots for:
• Firm cream, tan, or light brown tissue.
• Fine feeder roots near the outer soil.
• Thick roots circling the pot.
• Black, soft, or foul smelling roots.
• A solid layer of old soil that blocks drainage.
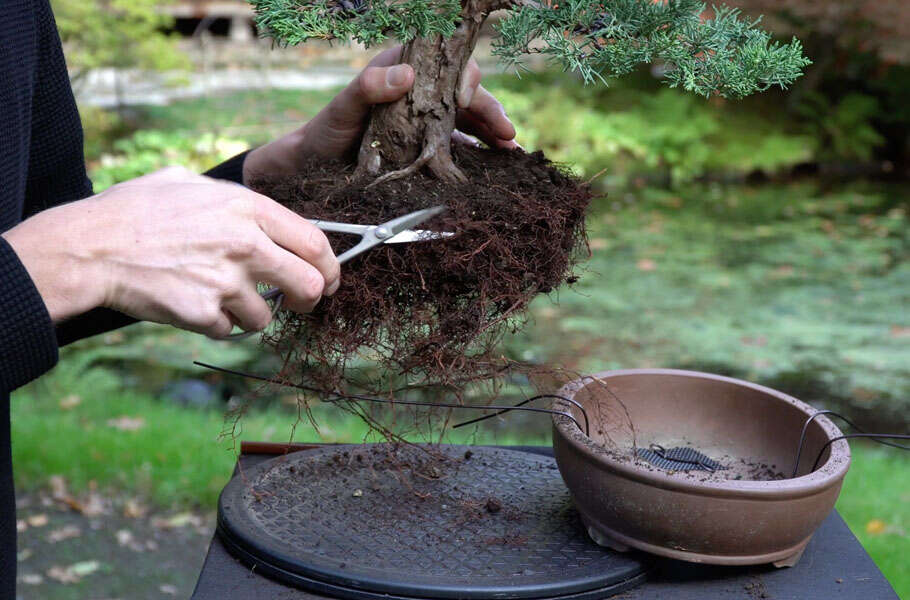
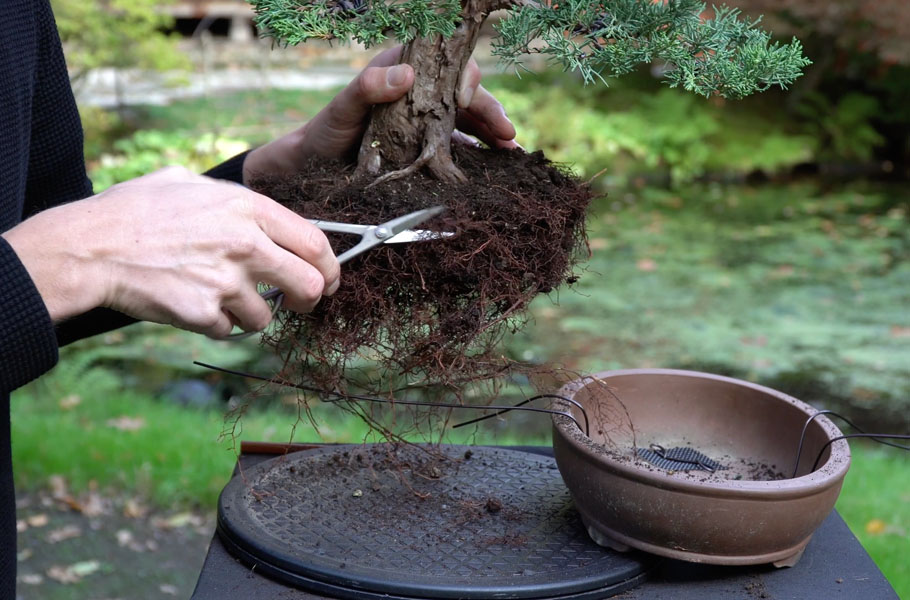
Juniper roots are not as forgiving as some deciduous bonsai roots. Avoid tearing and rough handling. Remove old soil gradually with a root rake, chopstick, or gentle stream of water. Do not strip every bit of soil from a healthy juniper unless there is a clear reason.

Choosing the Right Bonsai Soil
The right soil supports drainage, air flow, and stable moisture. Junipers dislike heavy, wet soil around their roots. A compact garden soil or regular potting soil can hold too much water in a bonsai container.
Many growers use a mix based on materials such as:
• Pumice for air space and drainage.
• Lava rock for structure and stability.
• Akadama or another clay based bonsai soil for moisture control.
A common approach is an even blend of these materials, but the best mix depends on your climate and watering habits. In a wet climate, use more open, fast draining material. In a dry climate, include more moisture holding particles.
Particle size also matters. Small trees usually need smaller particles, while large trees often do better in a coarser mix. The soil should not turn into powder after a season.
Do not add a thick layer of gravel at the bottom of the pot. This can create a perched water layer rather than improving drainage. A consistent soil mix from top to bottom is usually more effective.

Step by Step: How to Repot a Juniper Bonsai
Once you know when to repot juniper bonsai, prepare all tools before removing the tree. You may need a clean pot, bonsai soil, root rake, scissors, wire, mesh, chopsticks, and a watering can with a fine rose.
Follow these steps:
-
Clean the new or old pot with water and a mild brush.
-
Cover the drainage holes with mesh so soil does not wash out.
-
Add anchoring wire through the drainage holes.
-
Remove the tree carefully and inspect the root ball.
-
Untangle only the roots that are tightly circling or blocking drainage.
-
Trim damaged, dead, or excessively long roots with clean scissors.
-
Place a thin layer of fresh soil in the pot.
-
Set the tree at the correct height and angle.
-
Secure the trunk or root ball with wire so it cannot move.
-
Add soil around the roots and work it into air pockets with a chopstick.
-
Water slowly until clear water flows from the drainage holes.
-
Check that the tree is stable and that no large gaps remain.
Root pruning should be moderate. Removing a small amount of crowded root growth is often enough. Avoid cutting away half of the root ball unless an experienced bonsai professional has advised you to do so.
A stable tree recovers better. Movement can break new roots as they form, much like moving a newly planted seedling before it has taken hold.

How Much Root Pruning Is Safe?
The safe amount depends on the tree’s health, age, species, root condition, and aftercare. Juniper bonsai generally benefit from conservative root pruning. Their foliage may look tough, but the roots still need time to recover.
For a healthy tree, remove dead roots and a modest amount of circling roots. Keep many fine feeder roots close to the trunk. These roots are important for water and nutrient uptake.
Avoid major root pruning when:
• The tree is weak or recently collected.
• The tree has severe root rot.
• The weather is hot and dry.
• The tree has just undergone heavy branch pruning.
• You do not have a protected recovery area.
One mistake beginners often make is treating root pruning like a haircut. A bonsai is a balance between roots and foliage. If you remove many roots but leave a large amount of foliage, the tree may struggle to supply water to every branch.
When in doubt, do less. You can always perform a lighter repot later, but you cannot restore roots that were removed too aggressively.

Aftercare Following Repotting
After repotting, place the juniper in a bright, sheltered location. Protect it from strong wind, intense afternoon sun, and hard frost for about two to four weeks. It still needs light, but sudden stress can slow recovery.
Water thoroughly after repotting. Then water again only when the surface begins to dry. Do not keep the soil constantly wet. Juniper roots need oxygen, and wet soil can encourage rot.
For the first few weeks:
• Do not fertilize immediately.
• Avoid heavy pruning.
• Avoid major wiring.
• Do not place the tree in deep shade.
• Protect it from drying wind.
• Check the soil each day, especially in warm weather.
Light feeding can usually begin after the tree shows fresh growth. A balanced, mild fertilizer is safer than a strong dose. Always follow the product label.
Some yellowing or limited needle loss can occur after repotting. Severe browning, a sour smell, or rapidly declining foliage signals a deeper problem. Check drainage and root condition before adding more water.
Common Repotting Mistakes to Avoid
Repotting errors often come from good intentions. Growers want to give the tree fresh soil, cut every old root, or place it in a much larger pot. These choices can create more stress than benefit.
Avoid these common mistakes:
• Repotting on a fixed schedule without checking the roots.
• Choosing a pot much larger than the root ball.
• Using garden soil or dense houseplant soil.
• Removing all old soil from a healthy juniper.
• Cutting too many roots at once.
• Leaving the tree loose in the pot.
• Fertilizing right after root pruning.
• Keeping the tree in dark shade for too long.
• Watering on a fixed schedule instead of checking the soil.
The new pot should be only slightly larger than the trimmed root ball. A very large pot holds more moisture and can make root rot more likely.
Another common error is repotting after heavy styling. Major branch pruning, severe wiring, and root pruning all spend the tree’s stored energy. Space these tasks apart whenever possible.
Pot Size, Shape, and Drainage
A juniper bonsai pot should support the tree without holding excess water. The pot must have one or more large drainage holes. Mesh keeps soil in place, but it should not block water flow.
Choose a pot that gives the roots modest room to grow. A shallow pot may suit a mature tree with a compact root system, while a deeper pot may help a developing tree or a tree with a long root base.
The pot should also fit the tree’s design. Unglazed clay often suits rugged, natural styles. Glazed pots can work well with certain foliage colors and refined designs. Function comes first, but the pot should not look out of balance with the trunk and canopy.
Make sure the pot is strong enough for the tree. Junipers can become top heavy, especially after a long branch is styled. Secure the tree with wire so wind and handling do not loosen the roots.
Repotting a Juniper Bonsai After Buying It
Do not repot a newly purchased juniper right away unless there is an urgent problem. The tree may already be adjusting to a new light level, watering routine, and temperature.
Give the tree time to settle. A few weeks of observation can reveal how quickly the soil dries and whether the foliage is healthy. If possible, wait until the next suitable repotting season.
Check for these conditions before buying or repotting:
• Healthy green or blue green foliage.
• A firm trunk and stable root base.
• No sour smell from the soil.
• No visible pests or webbing.
• Water that drains from the pot.
• No major signs of drought or root rot.
If the nursery soil is poor but the tree is healthy, plan to repot during the next early spring window. A rushed repot can cause more harm than leaving the tree in imperfect soil for a few months.
Repotting Juniper Bonsai From Nursery Stock
Nursery stock often needs different treatment from an established bonsai. The root ball may contain heavy field soil, circling roots, or a dense mass of fine roots. It may also need several years of gradual work before it can live in a shallow bonsai pot.
When working with nursery stock, focus on health first. Move the tree into a suitable training container if the roots need room. Remove only enough soil and roots to improve drainage and create a stable base.
Do not force a large nursery juniper into a tiny bonsai pot in one session. Gradual root reduction is safer. Allow the tree to regain strength before performing another major operation.
This slower approach may feel frustrating, but bonsai is a long project. A year of patience can protect decades of future growth.
Seasonal Repotting Guide
The season affects both timing and recovery. Here is a simple guide for gardeners in the United States:
Early spring
This is usually the best season for repotting juniper bonsai. Work just before strong new growth begins.
Late spring
Repotting may still be possible in cool areas, but avoid trees that are already producing strong new shoots. Provide careful aftercare.
Summer
Avoid routine repotting. Heat, dry wind, and high water loss make recovery harder.
Fall
Fall can work in some mild climates, but new roots may not have enough time to develop before cold weather. Use caution.
Winter
Do not repot a dormant tree unless there is an emergency. Cold roots heal slowly, and freezing can damage exposed roots.
Local conditions matter more than the season name. Watch temperature, bud movement, soil moisture, and the tree’s overall health.
How Experienced Growers Judge Repotting Time
Experienced bonsai growers combine several clues. They look at the calendar, but they also study the buds, soil, roots, weather, and recent growth.
A useful decision process is:
-
Check whether the tree is healthy.
-
Look for early spring bud activity.
-
Confirm that the soil drains well enough.
-
Inspect the root ball if the timing is suitable.
-
Check the weather for mild conditions over the next two weeks.
-
Delay the work if the tree faces heat, frost, or strong wind.
One lesson many growers learn is that timing is about readiness, not urgency. I have seen trees recover well after a light, well timed repot, while trees repotted too late in hot weather struggled even with careful watering.
Another practical lesson is to take notes. Record the date, soil mix, root condition, pot size, and aftercare. These notes make the next decision much easier.
Frequently Asked Questions About When to Repot Juniper Bonsai
When is the best month to repot a juniper bonsai?
The best month depends on your local climate, but early spring is usually ideal. Repot just before the tree begins strong new growth and after severe freezing weather has passed.
Can I repot a juniper bonsai in summer?
Routine summer repotting is not recommended because heat and dry air increase stress. Repot in summer only when poor drainage, root rot, or another urgent problem threatens the tree.
How do I know if my juniper bonsai needs a larger pot?
Check the roots rather than choosing a pot based only on the tree’s size. If roots tightly fill the container and water drains poorly, a slightly larger pot may help.
Should I remove all the old soil when repotting a juniper bonsai?
No. Remove old soil gradually and preserve healthy roots whenever possible. Removing all soil can damage the fine root system and increase transplant stress.
Should I fertilize after repotting a juniper bonsai?
Wait until the tree begins showing fresh growth, often several weeks after repotting. Fertilizing too soon can irritate newly cut roots.
Can I prune branches and roots at the same time?
Light branch pruning may be acceptable, but avoid combining heavy styling with major root pruning. The tree needs enough foliage and stored energy to recover.
How often should an older juniper bonsai be repotted?
An older juniper may need repotting every three to five years, but some trees can go longer. Inspect the roots and soil condition instead of following a strict schedule.
Conclusion
The best time to repot juniper bonsai is usually early spring, just before new growth begins. Repot only when the roots are crowded, drainage has declined, or the soil has broken down. Use a fast draining soil mix, prune roots with restraint, secure the tree well, and provide gentle aftercare.
A careful repot is less like changing a plant’s address and more like giving its roots fresh breathing room. Watch your tree, keep simple notes, and choose timing based on health and local weather. With patience and good care, your juniper can build a strong root system and remain a healthy bonsai for many years. Share your repotting experience or explore more bonsai care guides to keep learning.

Laura Bennett is a gardening writer at MyGardenLabs who creates beginner-friendly guides focused on solving common plant care and gardening problems.