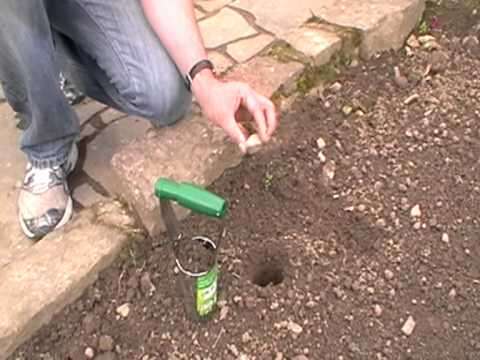
What Does A Bulb Planter Do: How It Works
A bulb planter creates neat, deep planting holes so you can plant flower bulbs faster and with less effort.
If you have ever planted dozens of tulips, daffodils, crocuses, or garlic bulbs with a hand trowel, you know how tiring the job can become. A bulb planter is a simple garden tool designed to make the right-size hole, place the bulb at a useful depth, and reduce strain on your hands and back. This guide explains what does a bulb planter do, how to use one correctly, which type suits your soil, and the common mistakes that can reduce flowering.
What Does a Bulb Planter Do?
A bulb planter removes a small plug of soil to create a planting hole for bulbs. Most models have a round, hollow cutting cup with a sharp edge, a handle, and sometimes a depth marker. You press or twist the tool into the soil, lift out the plug, place the bulb, and return the soil.
In simple terms, what does a bulb planter do? It makes bulb planting more even, clean, and efficient. The tool helps you keep bulbs at a suitable depth and spacing without digging a large hole for every plant.
A bulb planter works best for spring and fall bulbs such as:
• Tulips
• Daffodils
• Crocuses
• Hyacinths
• Alliums
• Snowdrops
• Small ornamental onions
• Some types of garlic
The tool does not plant the bulb by itself. You still need to check the bulb’s planting depth, place it with the pointed end up, and press the soil back around it.

How Does a Bulb Planter Work?
A bulb planter uses a cutting rim to slice into the soil. Depending on the design, you either push the tool straight down or twist it as you apply pressure. The hollow cup holds a plug of soil that can be lifted out and set aside.
After making the hole, place the bulb in the base. Then return the soil plug or cover the bulb with loose soil. This process keeps the planting area tidy and helps avoid disturbing nearby plants.
Most bulb planters follow these basic steps:
- Choose the planting spot.
- Push the planter into the soil.
- Twist or press until the tool reaches the needed depth.
- Lift out the soil plug.
- Place the bulb with its pointed tip facing upward.
- Replace the soil.
- Water lightly if the soil is dry.
Some planters have a spring-loaded release. This feature lets you empty the soil plug without using your fingers. Other models have a long shaft, so you can plant while standing.
What does a bulb planter do differently from a trowel? A trowel scoops and moves soil, while a bulb planter cuts a narrow, consistent hole. A trowel offers more flexibility, but a bulb planter often gives you better speed and uniformity.
Main Types of Bulb Planters
Bulb planters come in several designs. The best choice depends on your soil, planting volume, physical comfort, and bulb size.
Short-handled bulb planter
A short-handled model looks like a small cup attached to a grip. It works well for small beds, raised planters, and soft soil.
Its main benefits include:
• Low cost
• Easy storage
• Good control
• Light weight
• Useful for a few bulbs
The drawback is that you must bend or kneel while using it. That may feel uncomfortable during a large planting job.
Long-handled bulb planter
A long-handled bulb planter lets you work from a standing position. It often has a foot plate that helps you push the cutting cup into the soil.
This design can reduce bending and knee strain. It is especially helpful when planting many bulbs across a lawn or large border. However, a long-handled model may be harder to control in rocky or compacted soil.
Dibber-style planter
A dibber creates a narrow hole rather than removing a soil plug. It works well for small bulbs and loose soil.
A dibber is not always called a bulb planter, but it serves a similar purpose. It is less useful for large bulbs because the hole may not be wide enough.
Adjustable bulb planter
Some planters allow you to change the hole size or depth. This makes them useful if you grow both small crocuses and larger tulips.
Adjustable tools offer flexibility, but they may have more parts that can loosen or wear out. A simple, solid tool can last longer when used in tough soil.

What Are the Benefits of Using a Bulb Planter?
The main benefit is speed. A good planter can make many similar holes in less time than a hand trowel. This matters when you are planting a large drift of bulbs for a natural, full display.
A bulb planter also helps with consistency. Bulbs usually perform best when planted at a suitable depth. If some bulbs sit too close to the surface while others are much deeper, growth may be uneven.
Other benefits include:
• Less soil disturbance around existing plants
• Cleaner planting lines
• More consistent spacing
• Less hand strain
• Easier work in lawns
• Faster planting for mass displays
• Better control over planting depth
In my experience with bulb planting, the biggest improvement comes from reducing repeated scooping. A trowel makes you remove soil several times for one bulb. A bulb planter turns that task into one clean push and lift.
The tool can also make planting feel less overwhelming. Instead of viewing a bed as dozens of separate holes, you can work in a simple rhythm: mark, cut, place, cover, and move on.
What Does a Bulb Planter Do for Planting Depth?
A bulb planter helps create a hole with a similar depth each time. Still, the correct depth depends on the bulb type, soil, climate, and planting site.
A common gardening rule is to plant many bulbs at a depth of about two to three times the bulb’s height. For example, a bulb that is 2 inches tall may need a hole about 4 to 6 inches deep. Always check the planting instructions for the specific bulb.
General examples include:
• Small crocus bulbs may need a shallow hole.
• Tulips often need a medium-depth hole.
• Large daffodil bulbs may need a deeper hole.
• Ornamental alliums can need considerable depth.
Do not rely on the tool alone. A depth mark can guide you, but soil conditions can change the result. Loose soil may collapse slightly, while hard soil may prevent the planter from reaching its full depth.
One mistake I often see is forcing a short planter too deep into compacted ground. This can bend the tool or create a hole with compressed sides. If the soil resists, loosen the bed first with a garden fork.

How to Use a Bulb Planter Correctly
Using a bulb planter is easy, but a few small details improve the result. Start by choosing soil that is moist but not wet. Soil that is too dry can be hard, while wet clay may stick inside the tool and smear the hole walls.
Follow these steps:
- Prepare the soil by removing weeds, stones, and thick roots.
- Check the recommended depth for your bulb.
- Mark the planting spots with enough space for mature growth.
- Set the cutting cup on the soil.
- Push or twist the planter down to the desired depth.
- Lift the soil plug carefully.
- Place the bulb with the pointed end facing up.
- Return the soil plug without packing it tightly.
- Water only if the soil is dry.
- Add a light mulch layer when appropriate.
Avoid pressing the soil down with great force. Bulbs need air pockets around their roots, and tightly packed soil can slow root growth. A gentle firming is enough.
For a natural look, avoid perfectly straight rows unless that is your design goal. Toss a small group of bulbs onto the ground and plant them where they land. This creates a more relaxed pattern that resembles natural growth.
Can You Use a Bulb Planter in Grass?
Yes, you can use a bulb planter in grass, especially when planting bulbs that will bloom before the lawn grows strongly in spring. Crocuses, daffodils, and some small bulbs can work well in turf.
Push the planter through the grass and remove the soil plug. Place the bulb below the turf roots, then return the plug so the grass sits level with the surrounding lawn.
Keep these tips in mind:
• Use a sharp planter that can cut through roots.
• Avoid areas with buried cables or irrigation lines.
• Do not plant bulbs where frequent mowing will damage their leaves.
• Allow bulb leaves to fade before mowing them down.
• Choose bulbs suited to naturalizing in lawns.
A bulb planter is less effective in extremely compacted turf. Aerating the lawn first can help. You may also find that a long-handled model gives better leverage than a small hand tool.
Soil Conditions That Affect a Bulb Planter
Soil has a major effect on how well a bulb planter works. Loose loam is usually the easiest. Sandy soil cuts cleanly but may collapse when you remove the plug. Heavy clay can resist the cutting edge and cling to the tool.
The best working conditions are:
• Moist soil that crumbles when pressed
• Few stones or thick roots
• Good drainage
• Loose soil around the planting area
• No standing water
If your soil is hard, water it lightly one day before planting. Do not soak it. Very wet clay can become sticky and compacted, which may create poor conditions for the bulb even if the hole looks neat.
For rocky ground, a trowel or garden fork may work better. This is one limitation of what does a bulb planter do: it is a hole-making tool, not a replacement for full soil preparation.

Common Bulb Planter Mistakes to Avoid
A bulb planter can make planting easier, but it cannot correct poor planting choices. The most common mistake is planting every bulb at the same depth. Different bulbs have different needs, so read the label before you begin.
Other mistakes include:
• Planting bulbs upside down
• Using a dull or damaged cutting edge
• Spacing bulbs too closely
• Planting in waterlogged soil
• Leaving air gaps below the bulb
• Packing soil too firmly
• Planting under aggressive tree roots
• Mowing bulb leaves too soon
• Forgetting to label unusual bulb varieties
Another error is using a planter that is too small. A large bulb needs enough room to sit flat without being squeezed into a narrow hole. If the bulb bends, catches, or sits at an angle, use a wider tool.
After planting, look at the surface. The soil should be level, and the bulb should not be visible. If rain exposes it, cover it with more soil and check the surrounding drainage.
How to Choose the Best Bulb Planter
When choosing a bulb planter, focus on the tool’s construction rather than its appearance. A strong metal cup with a sharp edge will usually perform better than a thin tool that flexes under pressure.
Consider these features: