How Does A Bulb Planter Work: Simple Guide To Easy Planting
A bulb planter cuts a neat soil plug, creates planting depth, and places bulbs quickly.
Understanding how does a bulb planter work can make fall planting faster, cleaner, and more accurate. This simple garden tool uses a sharp cutting edge or hollow tube to remove soil, form a planting hole, and help you return the soil around the bulb. Once you know how each part works, you can choose the right planter and avoid common planting mistakes.

What Is a Bulb Planter?
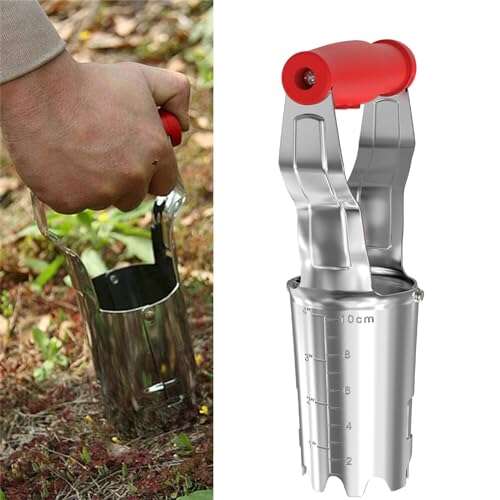
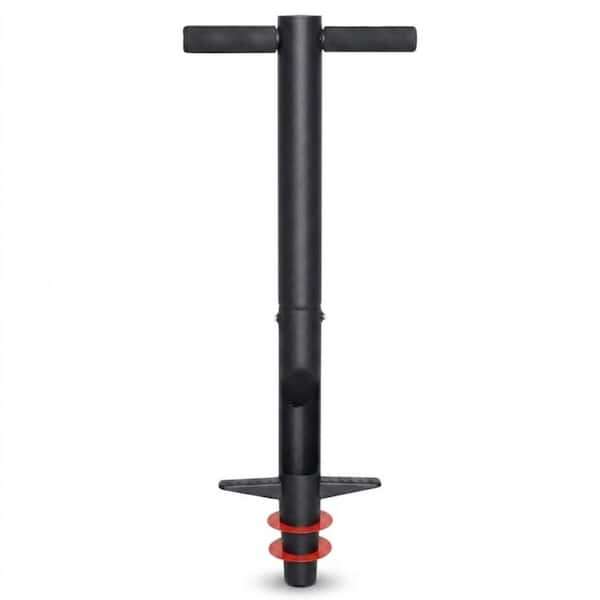
A bulb planter is a hand tool made for planting flower bulbs, such as tulips, daffodils, crocuses, hyacinths, and alliums. Most models have a metal cup, cylinder, or pointed blade that enters the soil and creates a hole with a set width and depth.
Some bulb planters remove a plug of soil. Others push soil aside and leave a narrow hole. The tool may have a short handle for close work or a long shaft that lets you plant while standing.
To understand how does a bulb planter work, picture a small cookie cutter for soil. It cuts into the ground, holds or moves the soil, and leaves a space for the bulb.
Common parts include:
• Cutting edge: Slices through soil and roots.
• Planting chamber: Holds the soil plug in some designs.
• Depth markings: Help you plant bulbs at a consistent depth.
• Handle: Gives you control and comfort.
• Foot rest: Lets you press the tool into firm ground.
• Long shaft: Allows upright planting with less bending.
A bulb planter does not dig a large garden hole. It makes a focused hole that matches the size of the bulb. This reduces soil disturbance and speeds up repetitive planting.
How Does a Bulb Planter Work?
The basic process is simple. You place the planter over the selected spot, press it into the soil, remove or push aside the soil, drop in the bulb, and cover it.
Here is how does a bulb planter work in practical steps:
-
Choose a planting spot with suitable light and drainage.
-
Place the cutting edge on the soil.
-
Press or twist the planter into the ground.
-
Stop when the tool reaches the needed depth.
-
Lift the planter, or pull the handle to release the soil plug.
-
Place the bulb in the hole with its pointed tip facing up.
-
Return the soil plug or brush loose soil over the bulb.
-
Water the area if the soil is dry.
The cutting edge does most of the work. A sharp edge cuts through loose soil with little effort. In firm soil, a foot plate or twisting action helps the blade enter the ground.
With a plug-style planter, the tool removes a round section of soil. You can place the bulb at the bottom, then replace the plug. This gives the bulb good soil contact and keeps the garden surface neat.
With a dibber-style planter, the tool makes a hole without removing a full plug. You then drop the bulb into the opening and close the soil with your fingers.
The answer to how does a bulb planter work depends on its design. Yet every model follows the same basic idea: cut or open the soil, create space for the bulb, and close the space again.

Types of Bulb Planters
Different bulb planters suit different soils, bulb sizes, and planting areas. Choosing the right type can save your hands, back, and time.
Cup-Style Bulb Planter
A cup-style planter has a hollow metal cylinder with a sharp lower rim. It cuts out a plug of soil that fits inside the cup.
This design works well in prepared garden beds. Many models include a spring-loaded handle that releases the soil plug after you plant the bulb.
Long-Handled Bulb Planter
A long-handled planter has a shaft that lets you work while standing. It is useful for large beds, lawns, and gardeners who find kneeling difficult.
However, long-handled models may struggle in rocky or compacted soil. The extra leverage helps, but it does not replace proper soil preparation.
Dibber or Spike Planter
A dibber has a pointed end rather than a hollow cup. It makes a narrow planting hole by pushing soil aside.
Dibbers are useful for small bulbs and loose soil. They are less suitable when you need a wide hole or want to remove a soil plug.
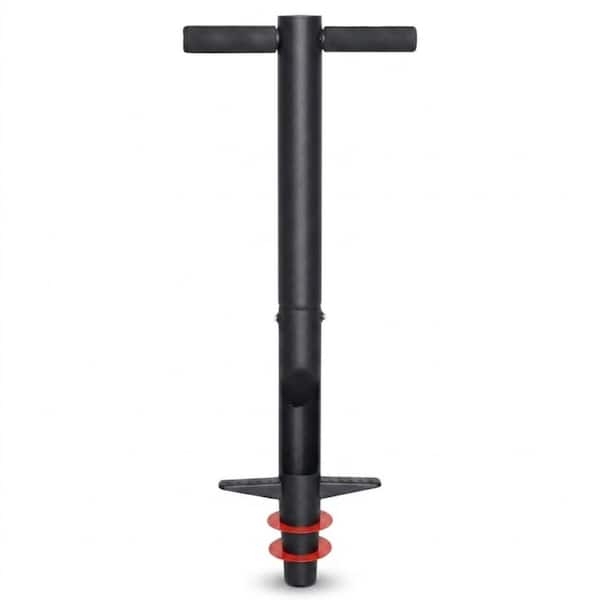
T-Handled Planter
A T-handle gives you a firm grip and lets you press down with both hands. This design offers good control in medium to firm soil.
It often works well for gardeners who want more force than a short hand tool provides without using a long shaft.
Adjustable Bulb Planter
Some planters have depth gauges or adjustable parts. These features help you set a consistent depth for bulbs of different sizes.
An adjustable model can be useful if you plant tulips, small crocuses, and large daffodils in the same season.
How Deep Should a Bulb Planter Go?
Planting depth depends on the bulb species, bulb size, soil type, and local climate. A common rule is to plant most bulbs at a depth equal to about two or three times the bulb’s height.
For example, a bulb that is 2 inches tall may need a hole about 4 to 6 inches deep. Always check the planting guidance for the specific bulb because some bulbs naturally grow closer to the surface.
General examples include:
• Crocus: About 3 to 4 inches deep.
• Tulip: About 6 to 8 inches deep.
• Daffodil: About 6 to 8 inches deep.
• Hyacinth: About 4 to 6 inches deep.
• Large allium: About 6 to 8 inches deep.
Cold regions may require deeper planting to protect bulbs from sharp temperature changes. In warm areas, bulbs may need a different depth to avoid heat stress and early sprouting.
A bulb planter with depth marks can help, but do not rely on marks alone. Measure from the soil surface to the base of the bulb, not to its pointed tip.
When considering how does a bulb planter work, remember that the tool creates the hole. You still need to decide the correct depth for the plant.
How to Use a Bulb Planter Correctly
Using the tool well matters as much as choosing the right tool. Poor technique can bend the planter, crush bulbs, or leave them at the wrong depth.
Follow these steps for reliable results:
- Prepare the soil
Remove stones, thick roots, and weeds. Work in compost if the soil is poor, but avoid creating a soft pocket that holds too much water.
- Check the soil moisture
Soil should feel damp but not wet. Mud sticks inside the planter and can damage soil structure. Bone-dry soil may be too hard for a small hand tool.
- Mark your spacing
Place bulbs in groups or drifts for a natural look. Keep enough space for mature growth and air movement.
- Cut the hole
Set the planter straight on the soil. Press down with steady force, or twist gently if the ground is firm.
- Confirm the depth
Use the planter’s gauge or measure the hole. A consistent depth helps bulbs emerge at a similar time.