How To Use A Bulb Planter: Simple Step-By-Step Guide
Knowing how to use a bulb planter helps you make neat holes, set bulbs deep, and enjoy stronger spring blooms.
Learning how to use a bulb planter is simple, but small details matter. Soil moisture, planting depth, bulb direction, and spacing all affect the final display. This guide explains the process step by step, including which bulb planter to choose, common mistakes to avoid, and how to care for bulbs after planting.
What Is a Bulb Planter?
A bulb planter is a hand tool that removes a small plug of soil. It creates a hole that is often the right size for tulips, daffodils, crocuses, hyacinths, and other flowering bulbs.
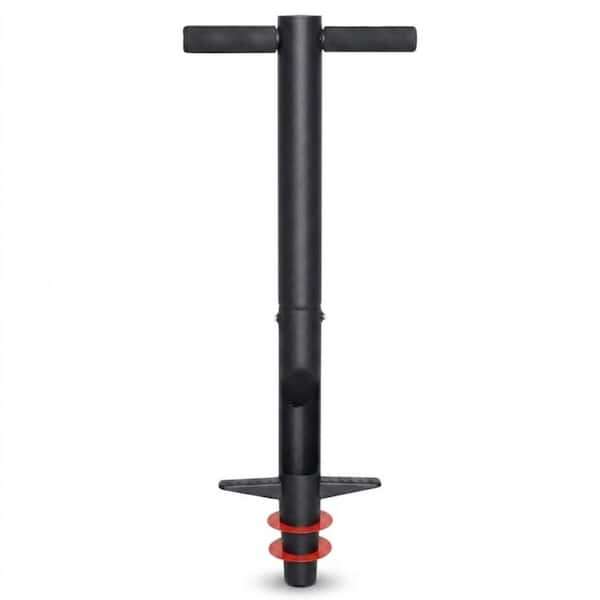
Most bulb planters have a metal cup with a sharp edge. Some models include a long handle, depth marks, or a spring release. Short-handled planters work well in loose garden beds, while long-handled models reduce bending and kneeling.
The main benefit is speed and neatness. Instead of digging each hole with a trowel, you can make clean planting holes with one push and twist. This works especially well when planting many bulbs in a lawn, border, or raised bed.
A bulb planter is not ideal for every soil type. Hard clay, rocky ground, and very dry soil can make the tool difficult to push. In those conditions, loosen the soil first with a garden fork or use a strong trowel.

Choose the Right Bulb Planter
The best tool depends on your soil, planting area, and physical comfort. A small hand planter gives you control, while a long-handled tool can save your back during large planting jobs.
Look for these useful features:
• A sharp, sturdy cutting edge that can enter the soil cleanly
• A comfortable handle that does not slip when your hands are wet
• Clear depth markings for consistent planting
• A strong shaft that will not bend under pressure
• A release mechanism that removes the soil plug easily
• A cup size that matches the bulbs you plan to plant
A standard bulb planter works well for medium bulbs such as tulips and daffodils. For small crocus or grape hyacinth bulbs, a narrow dibber may work better. For large bulbs, such as ornamental alliums, check that the planter cup is wide and deep enough.
When learning how to use a bulb planter, avoid choosing a tool based only on price. A weak planter may bend when it meets compact soil. A durable tool can last for many planting seasons if you rinse off soil and dry it after use.

Prepare the Soil Before Planting
Good soil preparation makes how to use a bulb planter much easier. Bulbs need soil that drains well because standing water can cause rot. Most bulbs perform best in loose soil with plenty of air spaces.
Choose a spot with the light level recommended for the bulb. Many spring bulbs enjoy full sun, although some early flowers can grow under deciduous trees before the leaves appear.
Before planting, remove weeds, stones, and thick roots. Then check the soil with a hand trowel or fork. It should feel moist and crumbly, not sticky or packed.
Use these preparation steps:
-
Water dry soil lightly the day before planting.
-
Break up hard areas with a garden fork.
-
Mix compost into poor soil, but avoid using fresh manure.
-
Improve heavy clay with organic matter and better drainage.
-
Mark the planting area before making holes.
Do not work wet clay soil. Walking on it or pressing a bulb planter into it can create dense clumps. These clumps restrict root growth and may hold too much water around the bulb.

How to Use a Bulb Planter Step by Step
The basic method is easy. The goal is to create a hole with a firm base, place the bulb correctly, and cover it without leaving air pockets.
1. Check the planting season
Plant spring flowering bulbs in fall, before the ground freezes. In many parts of the United States, this means September through November. The best timing varies by climate and bulb type.
Plant summer flowering bulbs, such as gladiolus and some lilies, after the danger of hard frost has passed. Always check the instructions supplied with the bulbs because local weather can change the ideal planting time.
2. Plan spacing and pattern
Place bulbs in groups for a fuller display. Odd-numbered groups often look natural in borders, while rows suit formal beds.
As a general guide, leave space between bulbs based on their mature size. Small bulbs may need only 2 to 4 inches of space. Large bulbs may need 6 to 8 inches.
Avoid planting in a perfect grid unless you want a formal look. A loose cluster can look more natural and hide gaps as the plants grow.
3. Position the bulb planter
Hold the planter upright over the chosen spot. Keep the cutting cup level with the soil surface.
For a long-handled model, place one foot on the footrest if the tool has one. Keep your back straight and use steady body weight instead of a sudden jump.
4. Push the planter into the soil
Press the cutting edge down to the required depth. Twist the planter slightly as you push. This cuts through soil and roots more cleanly.
Do not force the tool through stones or thick roots. Move the hole a few inches or loosen that area first. Excessive force can bend the shaft or cause you to lose balance.
5. Lift out the soil plug
Pull the planter straight up. Some models hold the soil plug inside the cup. Others leave the plug beside the hole or release it with a spring lever.
Set the soil plug nearby. You will use it to cover the bulb after planting.
6. Check the hole depth
Place the bulb beside the hole and compare its height with the hole. A common rule is to plant a bulb at a depth about two to three times its height, measured from the bulb base to the soil surface.
This rule is a guide, not a strict law. Follow the instructions for the specific bulb, especially in warm climates or heavy soils.
7. Place the bulb correctly
Set most bulbs with the pointed end facing upward and the roots or flatter base facing downward. If the bulb has no clear point, place it on its side. The growing shoot will usually find its way upward.
Handle bulbs gently. Do not squeeze, drop, or peel away healthy outer skins. The papery covering protects the bulb from drying and damage.
8. Replace the soil
Return the soil plug to the hole. Press it lightly with your fingers or the sole of your shoe.
Do not compact the soil too hard. Roots need small air spaces, and tightly packed soil can slow drainage. The surface should be level with the surrounding ground.
9. Water the area
Water after planting unless the soil is already very wet. Moisture helps settle the soil around the bulb and starts root growth.
Water deeply rather than sprinkling the surface for only a few seconds. After that, let the soil dry slightly between waterings unless rainfall keeps it moist.
Knowing how to use a bulb planter becomes much easier after a few holes. Work slowly at first, then develop a steady rhythm: position, push, lift, place, cover, and water.

How Deep Should Bulbs Be Planted?
Planting depth affects root growth, winter protection, flowering, and stem strength. A bulb planted too shallow may dry out, freeze, or produce weak stems. A bulb planted too deep may struggle to reach the surface.
Use the bulb package as your first guide. If no instructions are available, use the two to three times bulb-height rule.
Typical planting depths include:
• Crocus: about 3 to 4 inches deep
• Tulips: about 6 to 8 inches deep
• Daffodils: about 6 inches deep
• Hyacinths: about 4 to 6 inches deep
• Large ornamental alliums: about 6 to 8 inches deep
These ranges can change with soil type and climate. In very cold areas, bulbs may need enough depth to avoid repeated freezing and thawing. In warm areas, planting depth and chilling needs can differ.